
Why Propagation Works
Succulent propagation feels a little like magic, doesn’t it? Taking a single leaf or stem and coaxing it into a whole new plant. But it’s not magic, it’s biology. Succulents are extraordinarily resilient plants, evolved to thrive in harsh conditions, and that resilience extends to their ability to regenerate. They store water in their leaves and stems, which provides the energy needed to sprout new roots and shoots.
This inherent ability to reproduce vegetatively – meaning from parts other than seeds – is the key to successful propagation. It’s why a tiny leaf fragment can become a miniature version of its parent plant. For us, this means a fantastic opportunity to expand our collections without spending a fortune, share plants with friends and family, and experience the truly rewarding process of creation.
I often hear people say propagation is difficult, only for those with a "green thumb.’ That’s simply not true. While it does require a little patience and attention to detail, it’s remarkably easy to achieve with most succulent varieties. It’s a skill that builds confidence, and once you’ve seen a tiny root emerge from a leaf, you"ll be hooked. Don't be afraid to start – even experienced growers encounter failures, and each attempt is a learning opportunity.
Leaf Propagation: A Gentle Start
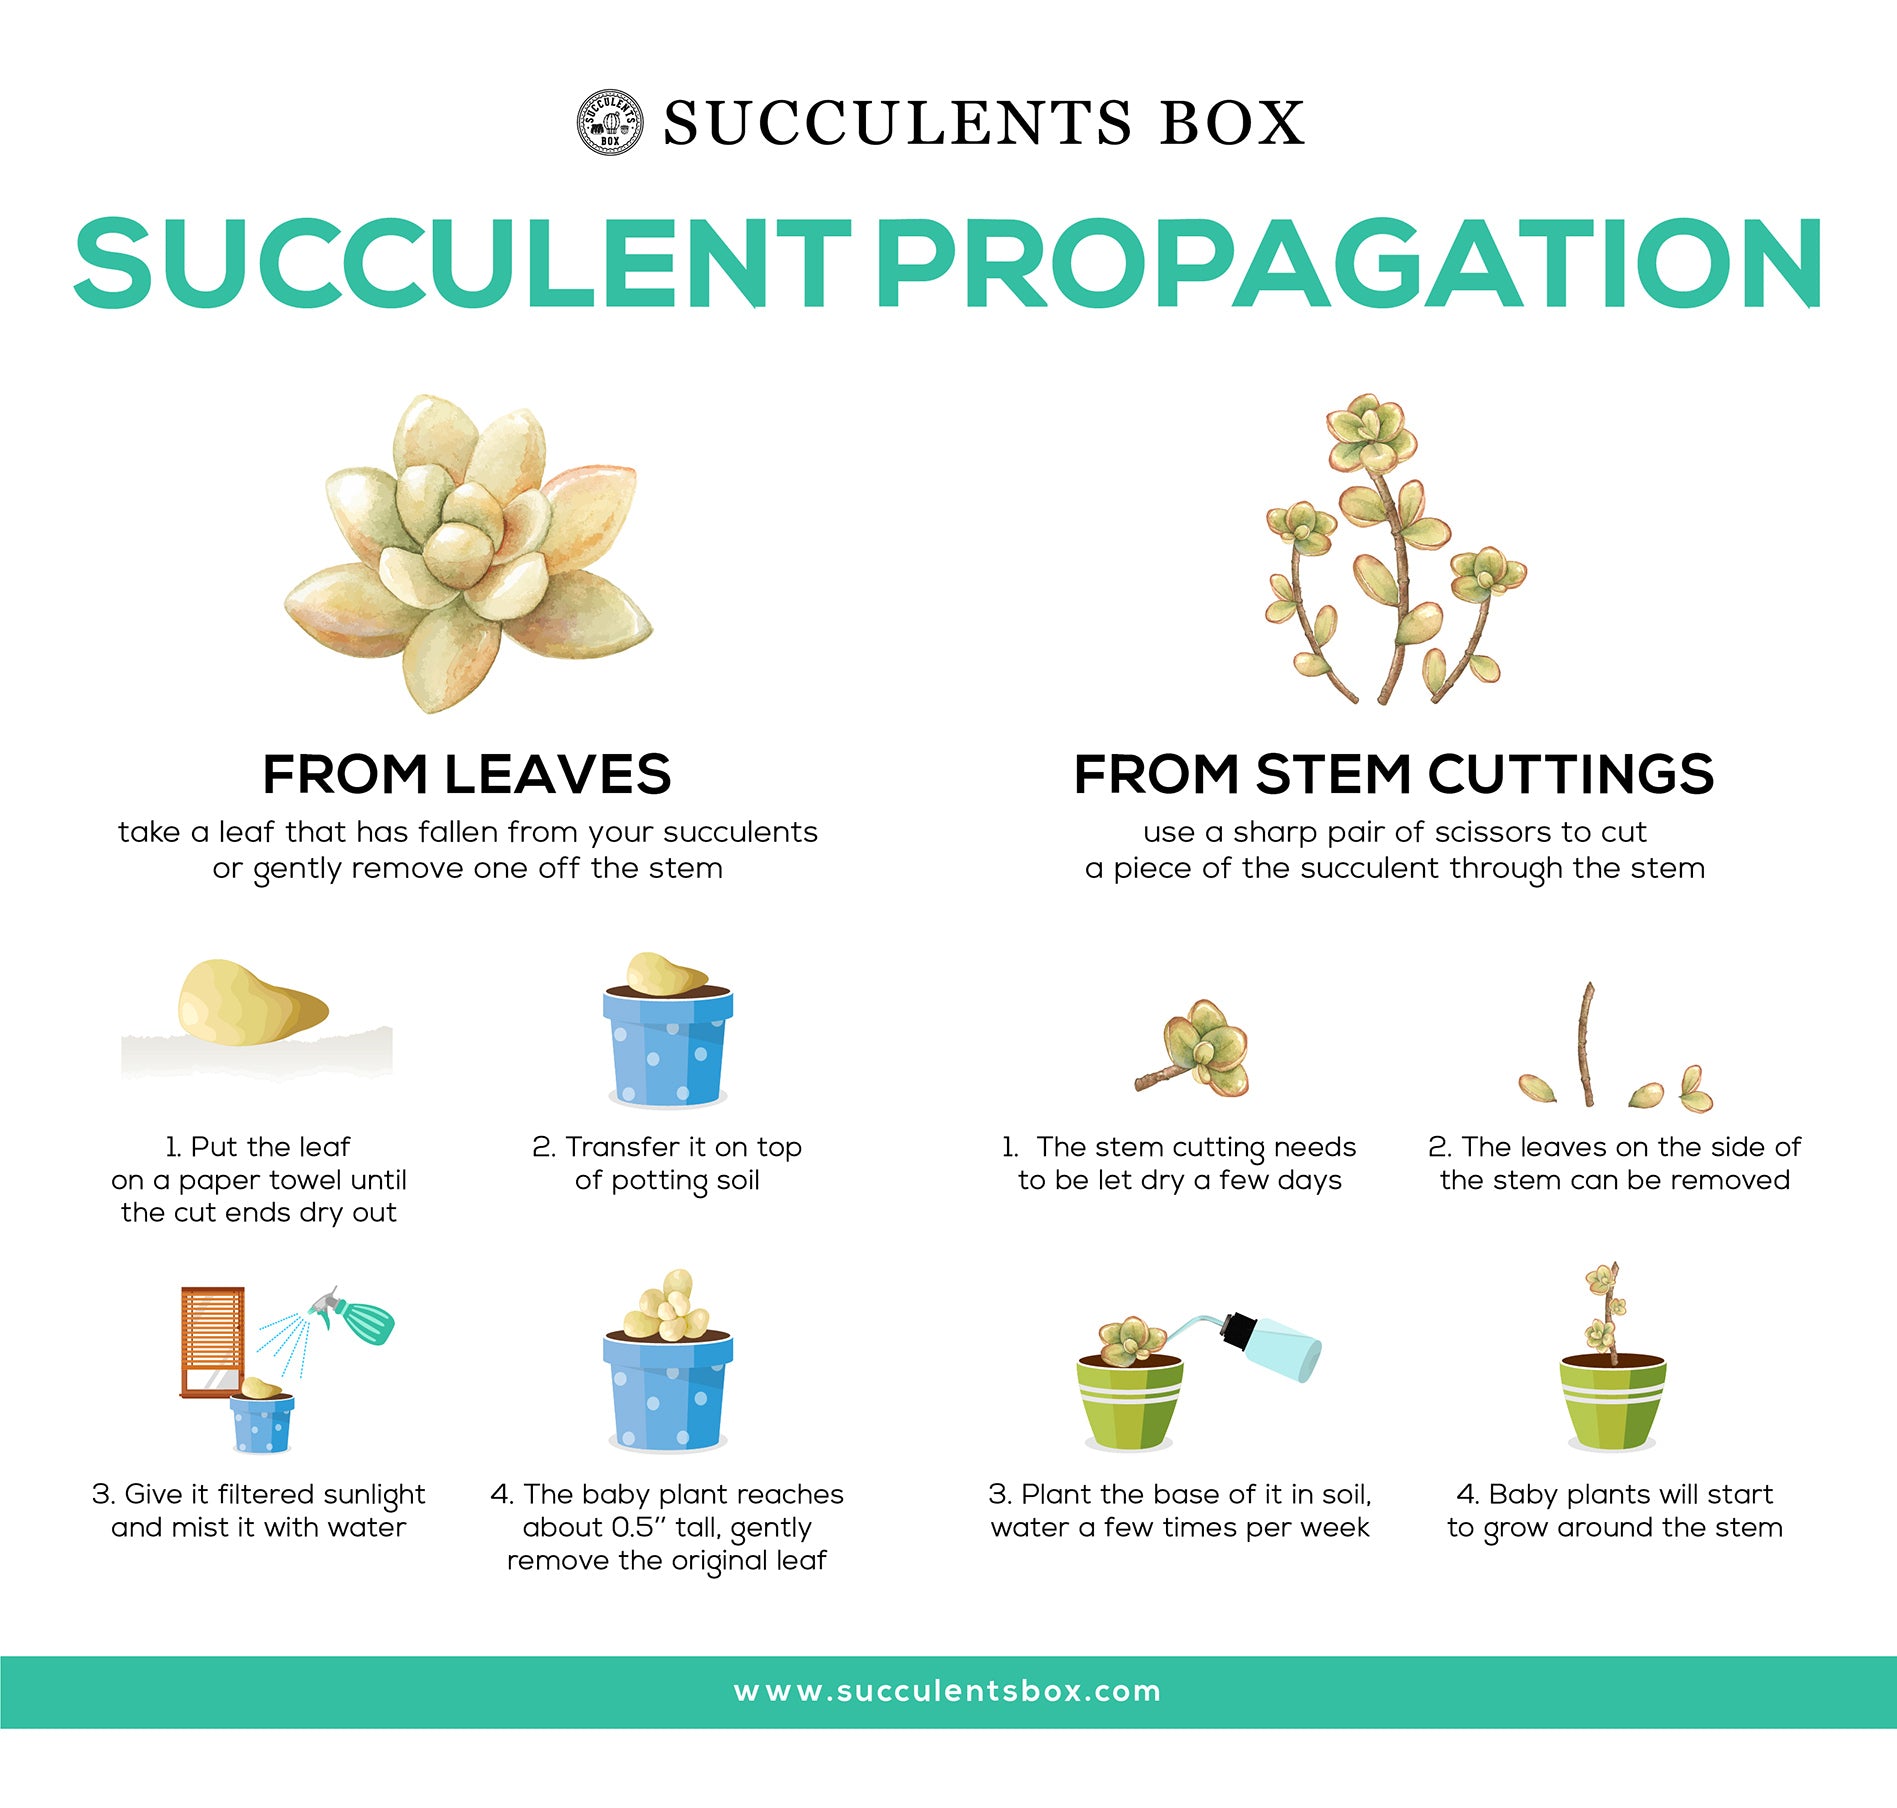
Leaf propagation is arguably the most popular method for multiplying your succulents, and for good reason: it’s relatively simple and works surprisingly well with many species. The process begins with selecting healthy leaves. Look for plump, firm leaves that aren’t damaged or showing signs of stress. Avoid leaves that are overly small or wrinkled.
Gently twist or wiggle the leaf from the stem. The goal is to get a clean break, ensuring you remove the entire leaf including the base where it connects to the stem. This base is where the roots will emerge. If a portion of the leaf remains on the stem, it’s unlikely to root. Once you have your leaves, you need to allow them to callous over. This means letting the cut end dry out for a few days – typically 3 to 7 – to prevent rot.
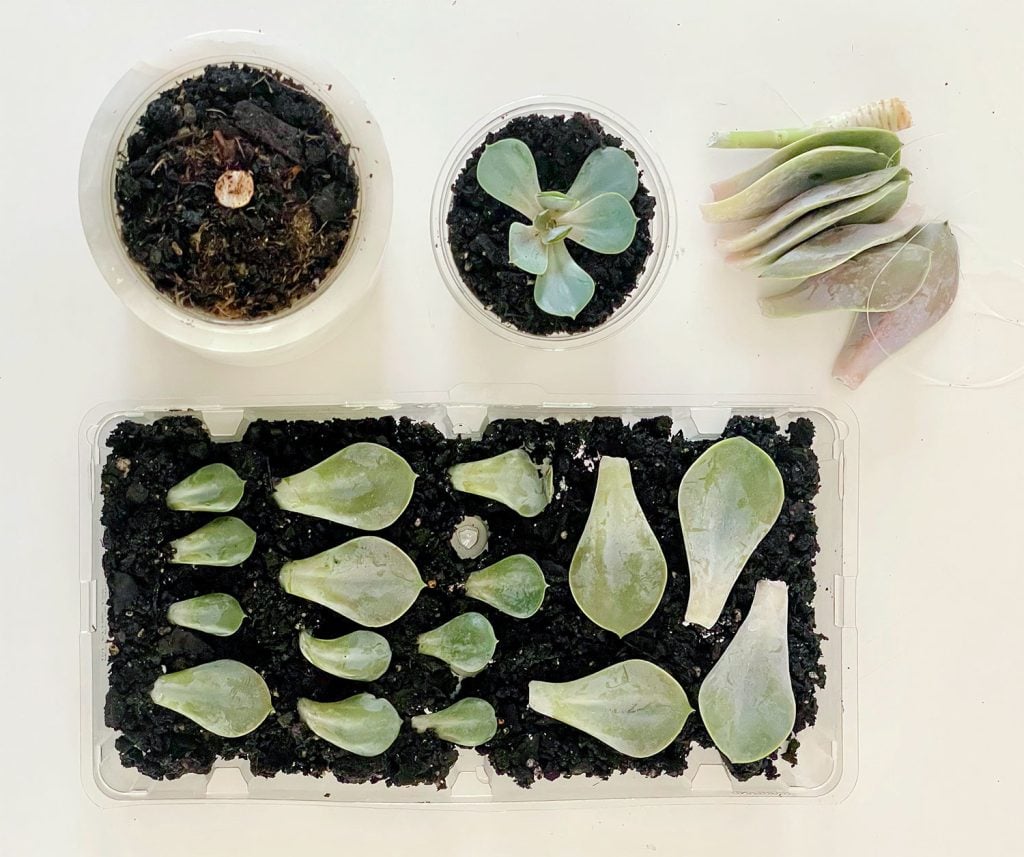
There are two main approaches to rooting leaves: directly on soil or in water. For soil propagation, lay the calloused leaves on top of well-draining succulent mix. You don't need to bury them. Mist the soil lightly every few days to keep it slightly moist, but avoid overwatering. For water propagation, suspend the calloused end of the leaf just above water – a small jar or glass works well. Change the water every few days. I’ve found that Echeverias and Sedums are particularly easy to propagate from leaves, while Graptopetalum and Graptoveria are also very reliable.
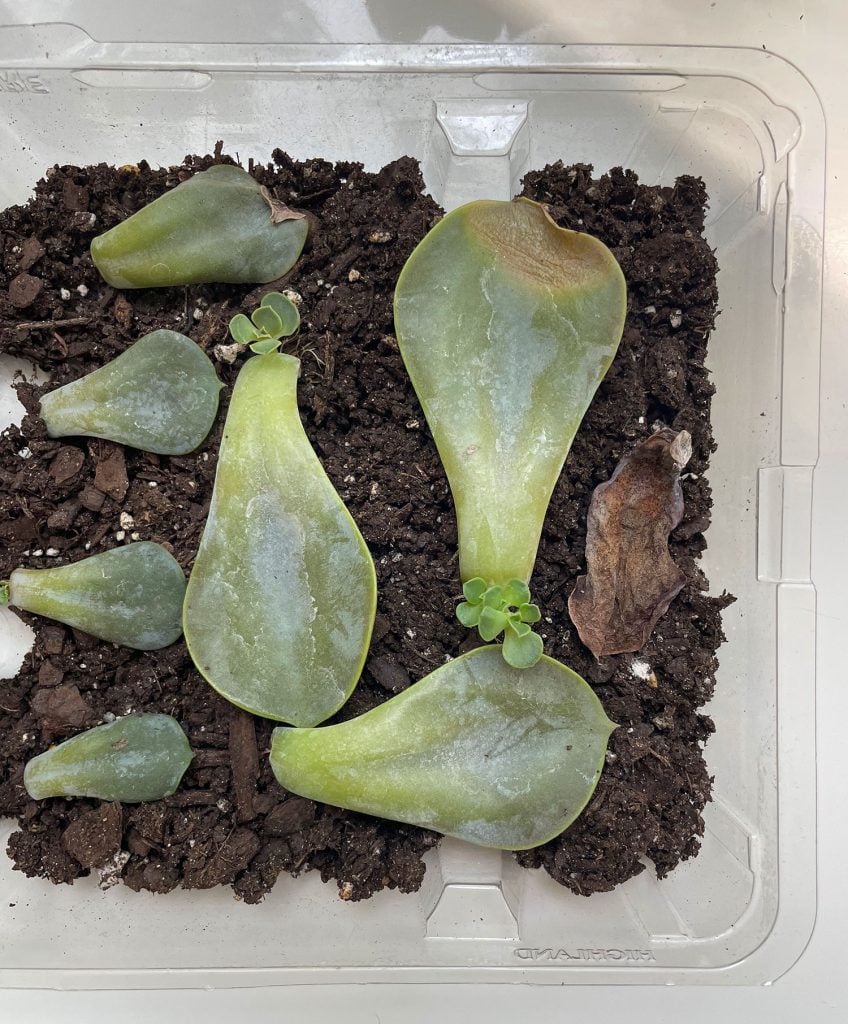
Troubleshooting is key. If the leaves turn black and mushy, they’ve likely rotted due to too much moisture. If they shrivel up and dry out without rooting, they may not have been getting enough humidity or the callous wasn’t sufficient. Be patient – it can take several weeks, even months, for roots and tiny plantlets (babies) to appear. Don’t disturb the leaves too much during this time. A little patience goes a long way.
I've had the most success with water propagation for Sedum varieties, as I can visually monitor root development. For Echeveria, I prefer laying the leaves directly on soil, as they seem to transition to soil more readily. It’s all about observation and adapting to what works best for each specific succulent.
- Choose plump, healthy leaves
- Ensure a clean break at the base
- Allow the cut end to callous over for 3-7 days
- Use well-draining soil or water for rooting
- Mist lightly or change water regularly
Stem Cuttings: Faster Results
Stem cuttings offer a quicker route to new succulents compared to leaf propagation. This method involves taking a section of the stem and encouraging it to grow roots. Select a healthy stem, avoiding any that are damaged or diseased. Use clean, sharp scissors or a knife to make a cut, ideally just below a node – the point where leaves emerge from the stem. These nodes are where roots will develop.
Like with leaf propagation, allowing the cut end to callous is crucial. This prevents rot and encourages root formation. The callousing process typically takes a few days to a week. Once calloused, you have two main options: rooting in water or directly in soil. Rooting in water is visually satisfying as you can watch the roots grow, but it can sometimes lead to weaker roots.
For water propagation, place the stem cutting in a jar or glass with just the bottom node submerged. Change the water every few days. For soil propagation, plant the calloused end of the stem cutting directly into well-draining succulent mix. Gently firm the soil around the stem. The main difference is that soil propagation can sometimes take longer to show visible signs of growth.
If the cutting blackens or develops mold, it’s likely due to rot. Remove the affected portion and allow the remaining stem to callous again before attempting to root it. Sometimes, a cutting simply won’t take – don’t be discouraged. Experiment with different methods and observe what works best for your succulents. I've found that Crassula and Aeonium species root particularly well from stem cuttings.
Identifying the nodes is essential. They look like small bumps or rings on the stem, and they're where the roots will emerge. A cutting without a node is unlikely to root. Remember to be gentle when handling the cuttings to avoid damaging them.
Offsets & Pups: Nature's Clones
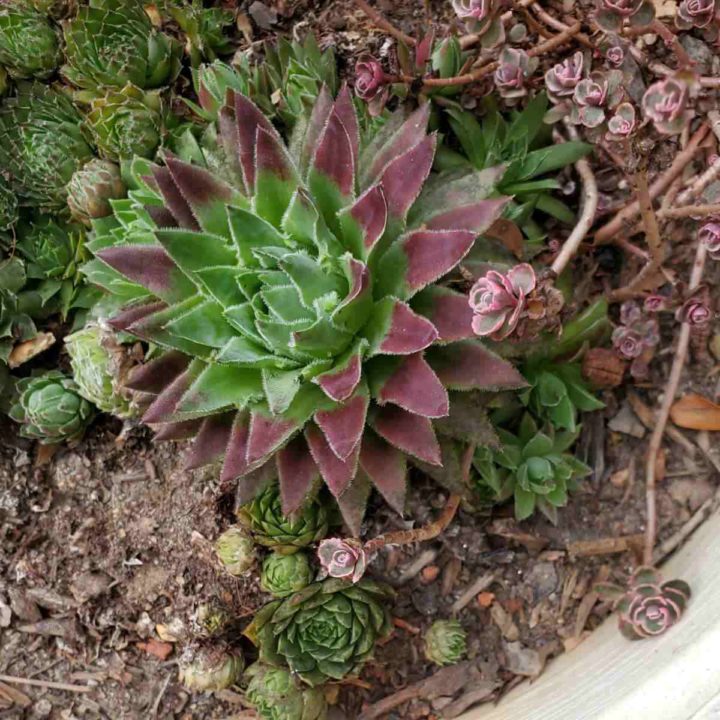
Some succulents naturally produce offsets, often called "pups’ – miniature versions of the parent plant that grow from the base or along the stem. This is the easiest method of propagation, as the offset already has its own roots. Identifying offsets is straightforward: they"re smaller plants growing alongside the mother plant.
Wait until the offset has developed its own established root system before separating it. Gently twist or cut the offset from the mother plant, ensuring you don’t damage the roots. Then, pot the offset in its own container with well-draining succulent mix. Sempervivum (hens and chicks) and Haworthia are particularly prolific producers of offsets.
It’s important to ensure the offset has a sufficient root ball before separation. If the roots are underdeveloped, the offset may struggle to survive. Providing consistent, but not excessive, water is key to helping the offset establish itself in its new pot.
Soil & Potting: Setting Roots Up
The most common mistake people make when propagating succulents is using the wrong soil. Succulents need extremely well-draining soil to prevent root rot. Standard potting mix retains too much moisture. A good starting point is a commercial cactus and succulent mix, but you can also create your own.
My go-to DIY mix is roughly equal parts cactus/succulent mix, perlite, and pumice. Perlite and pumice improve drainage and aeration. The ratio can be adjusted depending on your climate – drier climates may benefit from slightly more organic matter. When it comes to pots, terracotta pots are often preferred as they are porous and allow for better airflow, helping the soil dry out more quickly.
Plastic pots are also acceptable, but be extra careful not to overwater. Drainage holes are absolutely essential, regardless of the pot material. Larger pots aren’t always better, especially for propagation. A smaller pot restricts the root system, encouraging it to focus on establishing itself rather than growing extensively. This can lead to faster, more successful rooting.
- DIY Soil Mix: Equal parts cactus/succulent mix, perlite, and pumice
- Terracotta pots promote airflow
- Drainage holes are crucial
- Smaller pots encourage root establishment
Pot Material Considerations for Propagating Succulents
| Pot Material | Humidity Levels | Temperature Impact | Watering Frequency | Root Aeration |
|---|---|---|---|---|
| Terracotta | Excellent for low humidity; allows for increased air flow. | Breathes, helping to regulate temperature and prevent overheating. | Requires more frequent watering due to porosity. | Excellent; highly porous material. |
| Plastic | Suitable for higher humidity, but requires careful monitoring for rot. | Can heat up quickly in direct sun, potentially stressing roots. | Retains moisture longer, reducing watering frequency. | Moderate; less porous than terracotta. |
| Glazed Ceramic | Best suited for moderate humidity; less breathable than terracotta. | Holds temperature well, but can also retain heat. | Retains moisture for an extended period; requires infrequent watering. | Poor; glaze limits air exchange. |
| Recycled Materials (e.g., yogurt containers) | Adaptable to various humidity levels with proper drainage holes. | Temperature impact is dependent on material thickness and color. | Watering frequency depends on the plastic type and thickness. | Moderate to Poor; drainage is key to avoid root rot. |
| Coir Pots | Good for moderate humidity; coir fibers absorb excess moisture. | Provides some insulation, moderating temperature fluctuations. | Dries out relatively quickly, requiring regular watering. | Good; coir allows for some air circulation. |
Illustrative comparison based on the article research brief. Verify current pricing, limits, and product details in the official docs before relying on it.
Light & Environment: Rooting Conditions
Light is essential for successful propagation, but direct sunlight can scorch delicate leaves and cuttings. Bright, indirect light is the ideal condition. An east-facing window or a spot a few feet away from a south-facing window works well. Avoid placing propagations in dark corners or under artificial light alone.
Temperature is also a factor. Most succulents prefer warmer temperatures during the growing season (65-80°F / 18-27°C). Avoid extreme temperature fluctuations. Humidity isn’t as critical for succulents as it is for some other plants, but providing a slightly more humid environment can be beneficial, especially for leaf propagation.
Once the cuttings or leaves have rooted, gradually acclimate them to brighter light. Sudden exposure to intense sunlight can cause sunburn. Start by placing them in a shadier spot and slowly move them to a brighter location over a period of a week or two.
Troubleshooting Common Issues
Propagation isn’t always a smooth process. Rotting leaves or stems are the most common problem, usually caused by overwatering or insufficient airflow. If you notice rot, remove the affected portion immediately and allow the remaining part to callous before attempting to root it again. Lack of roots can be frustrating. Ensure the leaves or cuttings are getting enough light and that the soil is consistently (but not overly) moist.
Mold growth can occur in humid conditions. Improve airflow and consider using a fungicide if the mold is persistent. Pests, such as mealybugs, can sometimes attack propagations. Inspect your cuttings regularly and treat any infestations promptly with insecticidal soap or neem oil. I once lost an entire batch of Echeveria leaves to mealybugs – a painful lesson in vigilance!
I’ve had leaves simply refuse to root, despite my best efforts. Sometimes, it’s just a matter of genetics – some succulents are more challenging to propagate than others. Don’t give up! Experiment with different methods and learn from your failures. Propagation is a skill that improves with practice. Remember, even experienced growers face setbacks.
One of my biggest propagation fails involved leaving a tray of cuttings in direct sunlight. They all shriveled up within hours! It taught me the importance of providing adequate shade during the rooting process. Another time, I overwatered a batch of Sedum leaves, and they all rotted. It reinforced the need for well-draining soil and careful watering.
- Rotting: Reduce watering, improve airflow
- No Roots: Ensure adequate light and moisture
- Mold: Improve airflow, consider fungicide
- Pests: Treat with insecticidal soap or neem oil
Beyond the Basics: Unusual Methods
While leaf and stem propagation are the most common methods, some succulents can be propagated from flower stalks. This is particularly true for species like Sedum and Sempervivum. Simply cut the flower stalk after it has bloomed and place it in water or directly in soil. It’s a bit of an experimental technique, and success isn’t guaranteed.
Specialized propagation boxes or humidity domes can create a more controlled environment for rooting cuttings, especially in drier climates. Hydroponic propagation is another option, but it requires more expertise and specialized equipment. It involves growing succulents in water with added nutrients, without soil.
These less common methods are fun to experiment with, but they aren’t always reliable. They require a bit more knowledge and patience. Don’t be afraid to try something new, but be prepared for the possibility of failure. The joy of propagation lies in the process of learning and discovery.
No comments yet. Be the first to share your thoughts!