
How to Repot Succulents Without Killing Them: Part 1 - Preparation and Timing
Repotting succulents is one of the most crucial maintenance tasks for keeping your plants healthy and thriving. While these hardy plants are known for their resilience, improper repotting techniques can stress or even kill them. Understanding the right timing, materials, and preparation steps will ensure your succulents not only survive the transition but flourish in their new homes.
When Your Succulents Need Repotting
Recognizing the signs that indicate your succulents need repotting is essential for maintaining their health. The most obvious indicator is when roots begin protruding from the drainage holes at the bottom of the pot. This signals that the root system has outgrown its current container and needs more space to continue developing properly.
Another clear sign is when your succulent becomes top-heavy and unstable in its current pot. As succulents mature, their above-ground growth may exceed what the root system can adequately support in a small container, making the plant prone to tipping over.

Additional indicators include soil that dries out extremely quickly after watering, suggesting the root system has consumed most of the available growing medium, or when you notice the plant has stopped growing despite proper care conditions.
Optimal Timing for Repotting Success
The timing of your repotting efforts can significantly impact your succulent's ability to recover and establish itself in its new container. The ideal period for repotting succulents is during their active growing season, which typically occurs in spring and summer months.
During this period, succulents are naturally producing new growth and have the energy reserves needed to recover from the stress of being transplanted. Their root systems are also more active, allowing them to quickly establish themselves in fresh succulent soil and begin utilizing the additional space provided by a larger container.
Avoid repotting during the dormant season, typically fall and winter, as succulents conserve energy during this time and are less capable of handling the stress associated with root disturbance and environmental changes.
Essential Materials and Tools
Proper preparation begins with gathering the right materials and tools for the repotting process. The foundation of successful repotting lies in selecting appropriate containers and growing medium specifically designed for succulent care.
When choosing a new pot, select one that is only 1-2 inches larger in diameter than the current container. While it might seem logical to provide as much space as possible, oversized pots can actually harm succulents by retaining too much moisture around the root system, potentially leading to root rot.
Drainage is absolutely critical for succulent health. Ensure your new pot has adequate drainage holes to prevent water accumulation. If you fall in love with a decorative pot without drainage, consider using it as a cachepot with a properly draining inner container.

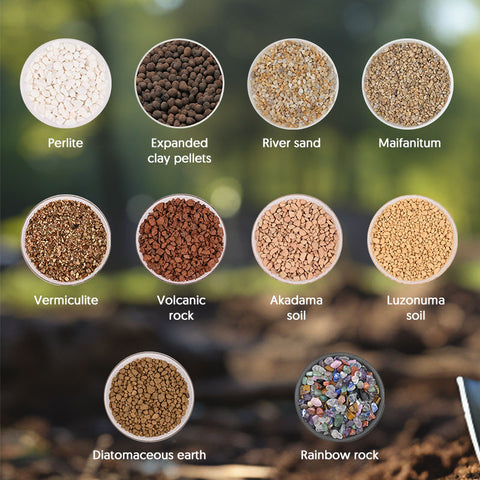
The choice of succulent soil is equally important. Standard potting soil retains too much moisture for these desert-adapted plants. Instead, use a commercial succulent or cactus mix, or create your own by combining regular potting soil with perlite, coarse sand, or pumice to improve drainage and aeration.
Pre-Repotting Preparation Steps
Before beginning the actual repotting process, take time to prepare both your workspace and your plants. Choose a well-lit area where you can work comfortably, and lay down newspaper or a tarp to catch any spilled soil.
Stop watering your succulents 3-5 days before repotting. Slightly dry soil will be easier to work with and reduce the risk of root damage during the removal process. This also minimizes the weight of the root ball and makes handling more manageable.
Gather all necessary tools including clean gardening gloves, a small trowel or spoon for soil work, and newspaper or paper towels for cleanup. Having everything ready before you start will make the process smoother and reduce the time your succulent spends out of soil.
In Part 2 of this guide, we will cover the step-by-step repotting process, post-repotting care, and troubleshooting common issues that may arise during the transition period.
How to Repot Succulents Without Killing Them: Part 2 - The Repotting Process
Now that you understand when and why to repot your succulents, it's time to learn the proper technique. Following the correct repotting process will ensure your plants transition smoothly to their new containers without experiencing transplant shock or damage.
Step-by-Step Repotting Guide
The key to successful repotting lies in gentle handling and proper technique. Start by watering your succulent a few days before repotting to ensure the soil holds together but isn't waterlogged. This makes removal easier while protecting delicate roots.
Begin by carefully removing the plant from its current pot. Turn the pot upside down and gently tap the bottom while supporting the plant. If the succulent is stuck, use a knife to loosen the soil around the edges. Never pull the plant by its leaves or stem, as this can cause permanent damage.
Once removed, examine the root system closely. Healthy roots should be white or light-colored and firm to the touch. Dark, mushy, or foul-smelling roots indicate rot and must be removed immediately. Use clean, sharp scissors or pruning shears to cut away any damaged roots, making clean cuts to prevent further infection.
Allow the plant to dry for 24-48 hours after root trimming. This drying period, called callusing, helps prevent bacterial infections when the succulent is placed in fresh soil. During this time, keep the plant in a shaded, well-ventilated area away from direct sunlight.
Choosing the Right Succulent Soil
Selecting appropriate succulent soil is critical for long-term plant health. Standard potting soil retains too much moisture and can lead to root rot. Commercial cactus and succulent mixes provide excellent drainage, but you can also create your own blend using equal parts regular potting soil, coarse sand, and perlite or pumice.
The ideal succulent soil should drain completely within minutes of watering while still providing adequate nutrition. Test your soil mix by watering it thoroughly – if water pools on the surface or drains slowly, add more drainage materials like perlite or coarse sand.
When repotting, place a small amount of fresh succulent soil in the bottom of the new pot. Position your plant at the same depth it was growing previously – burying the stem too deeply can cause rot, while planting too shallow may leave roots exposed.
Fill around the roots with more soil, gently tapping the pot to settle the mixture. Leave about half an inch of space between the soil surface and the pot rim to prevent water overflow during watering. Avoid compacting the soil too firmly, as succulents prefer loose, aerated growing medium.
Post-Repotting Care
Proper aftercare determines whether your repotting effort succeeds. Wait at least one week before watering newly repotted succulents. This waiting period allows any minor root damage to heal and prevents bacterial infections that thrive in moist conditions.
Place your newly repotted succulent in bright, indirect light for the first few weeks. Direct sunlight can stress plants that are already adjusting to their new environment. Gradually introduce more light as the plant establishes itself in its new pot.
Monitor your succulent closely for signs of transplant shock, including wilting, color changes, or dropped leaves. Some leaf loss is normal during the adjustment period, but excessive dropping may indicate problems with soil drainage or root damage.
Repotting Success Checklist
Remember that repotting is stressful for plants, so patience is essential. Most succulents take 2-4 weeks to fully establish in their new containers. During this period, maintain consistent care routines while watching for signs of new growth, which indicates successful transplantation.
With proper technique and patience, repotting becomes a routine maintenance task that keeps your succulents healthy and thriving for years to come. Regular repotting every 1-2 years, or when plants outgrow their containers, ensures optimal growing conditions and prevents common problems like root binding and nutrient depletion.
No comments yet. Be the first to share your thoughts!